25 Tips for Improving Greenhouse Efficiency in Cannabis Cultivation
Features – Cultivation
Pointers to keep your greenhouse facility running smoothly, prevent major malfunctions and help reduce overall expenses.
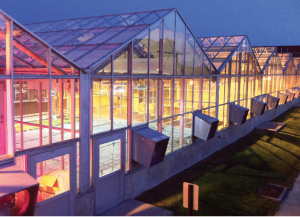
True story: A certain agricultural chemical/biotech firm wanted to upgrade the environmental controls for its $20 million research greenhouse complex. Instead of choosing a system designed for greenhouse environments, they went with a highly regarded global company whose software ran the adjacent labs and offices in its world headquarters. The young woman who ran the greenhouses tried to convince the firm to reconsider, but the engineers and administrators told her not to worry.
Five years later, I sat with the consultant team comprised of outsiders being paid to tell the company’s executives what its own biologist had warned them about years prior. The primary reason the company was not meeting its research goals was that its greenhouse controls couldn’t respond fast enough for a glass building in the sun. During the discussion, I borrowed from a friend a favorite line about greenhouses:
“It’s more machine than building.”
I share that story because I believe environmental control is where efficiency starts with your greenhouse:
System Investments
 1. Buy the most sophisticated control system you can afford, maybe more than you can afford. All efficiencies made to the structure and equipment will pale in comparison to this investment.
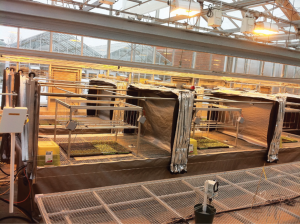
2. Integrate as much equipment as you can, not just heating and cooling, but especially lighting and shading.
3. Control lighting and shading together (using weather data) to enable you to set a daily light integral target (accumulated light) in varying weather and seasons, and—as evidenced from my own controlled experiments with multiple greenhouse bays—reduce the hours your lights run by about 30 percent (rather than keeping them on 18 hours per day).
4. Integrate your boiler, humidifiers and circulation fans. Track operational minutes for each piece of equipment. This allows you to quantify energy-saving initiatives and reduce equipment over-cycling that normally goes unnoticed.
Methods of Monitoring
5. Examining temperature graphs will show you when swings are too great—known as “saw-toothing” by the jagged graph line.
6. To alleviate these, widen the deadband (the range of temperature of typically 2 to 4 degrees Fahrenheit where neither heating nor cooling units operate) around your desired temperature—or use weather influences that automatically adjust the deadband depending on sunlight, outdoor temperature or wind. Programs can be developed that rarely need to be tweaked. In my experience, after making some initial mistakes, I only needed to adjust programming seasonally. I made the heating come on a little quicker in winter, and the cooling quicker in summer. Spring and fall are the most challenging seasons for environmental control because of simultaneous bright, sunny weather with chilly temperatures. The incoming air needs to be heated or it could shock the plants.
One set of tools that operate independently of your controls are the hand-held meters and loggers that will validate your environments and calibrate your sensors. They can also be used to find undesirable micro-climates within a room.
7. You should own a good photosynthetically active radiation (PAR) light meter. This will provide averaged readings over time and can be modified to accurately determine light within and above the canopy.
8. You should also have hand-held temperature and humidity sensors (small data loggers that can be distributed around a room), with a way to protect them from direct sunlight, which affects accuracy. This year, I will begin testing wireless sensors that will provide an array of data readings in hopes of validating another tool for growers.
Climate Control Upkeep
 9. examine the natural gas heaters. As he predicted, I saw thin strips of daylight in the heat exchangers, indicating cracks that were venting air pollutants into my growing environment.
10. If you use hot water for your heaters rather than gas, confirm that the valves are truly opening by using an infra-red temperature gun pointed at the unit heaters or the radiant pipes. This makes your pre-winter check go quickly. Sometimes the oscillating handle on the outside of a heating valve moves while the mechanism inside has seized. Hot water valves stuck open can go unnoticed. A good control system will monitor the temperature of the heating water to identify this problem. Another sign of this is a greenhouse that is cooling when it normally wouldn’t need to, such as at nighttime.
11. Cooling can be better controlled with multiple exhaust fans operating independently, staging the appropriate amount of equipment for the current cooling demand. Investing in variable-speed fans can take this staging one step further than using a one- or two-speed fan, while reducing ambient noise.
12. Routine belt replacement is essential for fans, as is having a spare motor on hand for quick change-out; otherwise you may have to wait 48 hours for one to arrive.
13. When selecting evaporative cooling pads, opt for a brand with a black, half-inch coating on the greenhouse-facing fluted edges. The coating prevents algae and makes cleaning as easy as a hose-off. In fact, I used to pay extra to have pads coated on both sides to prevent scale (hard water) build-up on the exterior-facing side. However, most of my algae problems were solved by 14. disabling at night the pumps that were wetting these pads. Other managers have found eight hours of drying to be suitable, but I had to leave them off for 11 hours (8 p.m. to 7 a.m.). This saved me the time and expense of adding disinfectant weekly to my two-dozen pad reservoirs.
15. Water flow over your evaporative pads should be adjusted to wet the entire pad without splashing the floor.
16. Leaks in gutter seams can be repaired with clear butyl gutter sealant dispensed with a caulk gun.
17. The pipes of this system, as well as the reservoir, should be cleaned two to four times per year, as the primary cause of pump failure is sediment clogging the intake. The pipe that distributes water above the pad may become clogged with scale, particularly at the end furthest from the pump. Bore out any clogged holes in the pipe.
18. It is vital to bleed off some of the reservoir water as the pump runs, otherwise, as the water evaporates off the pad, the minerals left behind will accumulate in the reservoir and eventually on the pads themselves. Pads calcified this way will not only cool less efficiently, but they will grow so heavy as to pull the pad frame away from the wall.
19. The bleed-off valve needs to be checked and adjusted to make sure it is removing at least one-half gallon per minute.
Vibration over time may change this flow, so 20. check it monthly during the cooling season. For my systems, that flow rate corresponded with a stream of water about the width of a pencil. More flow won’t hurt, but it wastes water.
One more true story (and lesson learned): Cottonwood tree seed fluff once clogged the back of my evaporative pads, and the poorly managed bleed-off valves caused the fluff to become calcified, like an impenetrable petrified spider web that ruined the pads!
Constant monitoring and maintenance can help you avoid major mishaps in your greenhouse, help your environmental systems run more efficiently and effectively, and foster healthy plant growth as well as a healthier bottom line.
